Charcoal Still Life Drawings at the Art Show at the Miscoe EXPO
Alice Matthews Gentili
“All the visible world is only light on form.” Andrew Loomis
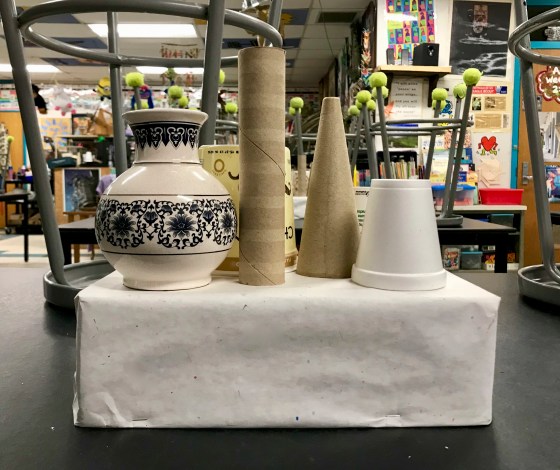
For the past few weeks, my fifth grade students have been creating charcoal still life drawings. They began by sketching a still life positioned in the middle of the table, while observing light, shadow, and form in their sketchbooks. We had explored ellipses just before undertaking this assignment, and this was a great chance to employ that knowledge in an authentic project. Students were learning to see, yet also un-see labels on containers and decorative motifs on vases, to focus on light, shadow, form, shape, perspective, and spacial relationship.
Still life
For most students, this was their first experience with charcoal and found themselves either impressed or dismayed by the dark darks they effortlessly achieved. Blending with blending stumps or tortillas was also a new experience, as was using a kneaded eraser. Most exciting was learning that both the stump and eraser could be used as drawing tools, especially when using the eraser to return light to the form.
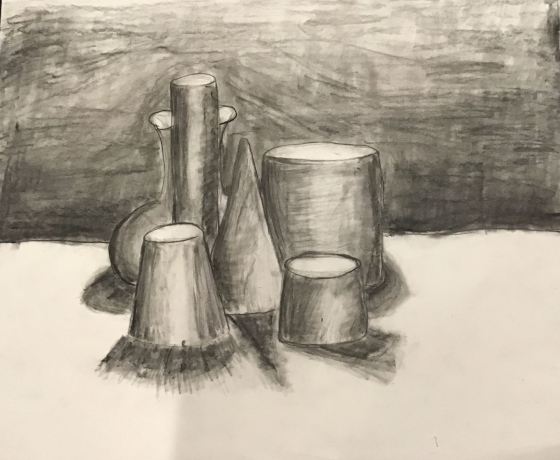
Maya Williamson: First, I drew out the outline of the shapes I saw from my angle of the table. Next, I shaded and blended in the shapes where the objects looked darker or lighter. I also drew a horizon line, the table, in the background. To complete my still life, I shaded in the background, and erased the finger prints. I feel like I got better at blending, and I learned that things look different from far away. I also had lots of fun making much still life come to life.
Students then took a photo with her/his iPad, cropped out everything but the drawing, and uploaded it to Artsonia where they also added an Artist Statement.
Ryan May: This charcoal still life took about 4 classes to finish but I’d say it was worth it. I had to mostly do shading and lighting to make I look like it had a shadow. I maybe could have erased a lot of the fingerprint marks and marks around the still life but I also feel like if I did was this whole thing again, I would probably do better shading on the shapes. The process to make this artwork was drawing out the shapes, shading them in, then coloring the background, and then after doing the shadows around the still life, blending the all the charcoal together. So, after those 4 classes, I think I did well on this artwork.Estella SoaresMarley Loucks: First, I started by sketching the still life and drawing the shadows. Then, I shaded all of my sketches and started to do the background. Lastly, I shaded in the background and erased all of my fingerprints off the bottom. I feel like it came out good but I could have done better. If I were to do it again, I would make the background a little bit more down and I would make the shadows a little bit more dark.Ella Martin: First I drew the objects. Then I shaded the objects. After that I drew the shadows. And finally I shaded and blended the background. I feel that it came out good. I might make the background better next time.Kaycie Gardner: I made this art by first looking at the still life then I drew it with charcoal pencil. When I was done I started shading to make shadows by using some of the charcoal tools. Then I drew a horizontal line in the back and then shaded on top of it so that it made it look like it was on a table. Then I I made it lighter in some spots and darker in the other spots to make it look even more real. I feel that my art came out good, I may be able to do a little better next time, but I think I did my best and it came out real good! What I might do differently next time is that I might put my shadows in different spots, and I may put the still life more in the middle of the page. But I think it come out good, and that is how I made my art!Anna Tsuchiya: I think that if I was going to do it again then I would try to get less finger prints on my drawing because I spent a lot of time trying to erase them. I think my still life is pretty good compared to how weird looking some of my art is. My favorite step was the blending because for some reason it satisfied me to see the lines I made combine together. It looks like it could do with some improving but I think over all I did a pretty good job!Aiden Fayer: I started by making a light outline.Then I made the shading then the shadows and last the back ground.I really like how it came out.The only thing I dont feel goodd about is the background. I woulldd make the background lighter and more blended.Orianna Murphy: To make this artwork I used a charcoal pencil and a eraser. I first sketched the basic shapes in. I then shaded by blending the charcoal with a blending stick. I finally did the background creating a dark shadow line giving the effect of a table. I feel like this art came out very well, the shading turned out better then I thought it would. If I where to do this project again I would spread the shapes out a little more instead of having them all clustered in the center of the page.Devan Rankins: I used techniques such as shading, light, shadow, and blending. I don’t think it came out that good. Be neater. I first drew what thing I saw, then I drew some details. After that I started drawing shadows, then the background.Michael Albert: My process was first I put all of the objects down and then I started to shade then I used the shading stick and then I started to do my backround.How I feel about how it came out, I thought it came out pretty well it just that I need to shade more and try to erase the finger prints. If I were to do anything differently I would shade the objects more.
This artwork and so much more will be on display at the Art Show at the Miscoe EXPO on Wednesday, April 10 from 6-8pm.